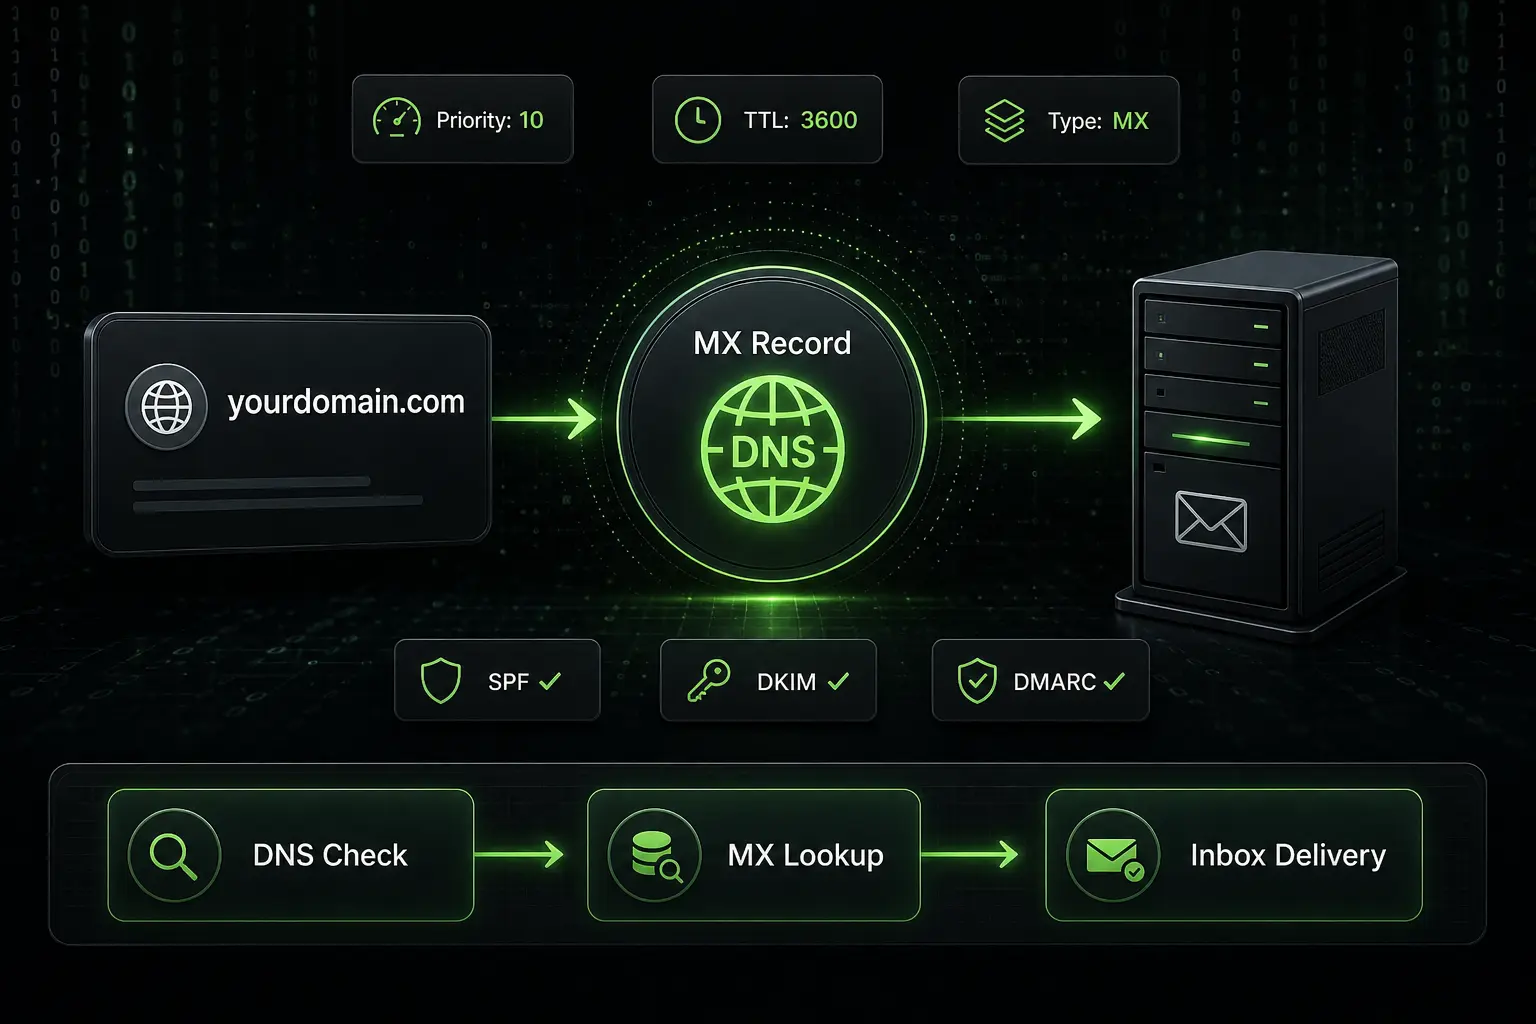

A DNS Mail Exchanger record (MX record) is the entry in your domain’s DNS zone that tells the rest of the internet which servers should receive email sent to your domain. When someone emails contact@example.com, their sending server queries the DNS for the MX record of example.com to know where to deliver the message. Without a valid MX record, your domain cannot receive mail. With a misconfigured one, your cold email campaigns hit spam folders or never arrive at all.
This guide walks through what a DNS mail exchanger is, how priority works, how it interacts with SPF, DKIM, and DMARC for deliverability, and how to check and fix MX records before launching a cold email program. If you run outbound at scale in 2026, MX records are not an IT detail: they are a deliverability gate.
What’s inside
- What a DNS mail exchanger record actually is
- The exact format and priority of an MX record
- MX records and SPF, DKIM, DMARC: the full chain
- How to check your MX records in 3 ways
- Common MX misconfigurations that kill deliverability
- How to add or modify an MX record
- Worked example: deliverability rebuild across 3 domains
- MX records and cold email + 3 FAQs + 3 dated next steps
Key takeaways
A DNS MX record points your domain to the mail server(s) that accept incoming email for it. Each MX record has a priority value (lower = preferred). Multiple MX records create failover redundancy or, with equal priorities, load balancing. MX records alone don’t protect deliverability: you also need SPF, DKIM, and DMARC properly aligned. If you run cold email in 2026, audit MX, SPF, DKIM, DMARC on every sending domain before the first batch. Tools like MXToolbox, dig, or nslookup verify configuration in under a minute.
What a DNS mail exchanger record actually is
A DNS Mail Exchanger record, commonly called an MX record, is a specific type of DNS resource record. Its sole purpose is to direct email traffic to a domain. When a sending mail server (an MTA, Mail Transfer Agent) needs to deliver a message to user@example.com, it doesn’t guess where to send it. It performs a DNS query asking: “what MX records does example.com publish?”
The DNS response returns one or more mail server hostnames, each with an associated priority number. The sending MTA then opens an SMTP connection to the highest-priority server (lowest numeric value) and delivers the message. If that server is unreachable, the MTA falls back to the next-highest priority, and so on.
Two important properties define MX records: they must point to hostnames, not IP addresses (so they need to resolve through A or AAAA records), and they only handle incoming email. Outbound email from your domain is governed by SPF, DKIM, DMARC, and the reverse DNS of your sending IP, not by your MX records.
The exact format of an MX record
An MX record has three components: the domain name, the priority, and the target hostname. In standard DNS zone file syntax, a typical entry looks like: example.com. 3600 IN MX 10 mail1.example.com., with a second line for a backup at priority 20 pointing to mail2.example.com.
Field by field: example.com. is the domain, 3600 is the TTL (Time To Live, in seconds), IN means Internet class, MX is the record type, 10 and 20 are priority values, and mail1.example.com. / mail2.example.com. are the receiving mail server hostnames.
Two notes about format. First, the target must always be a hostname (FQDN), never an IP address: pointing an MX record at 192.0.2.1 violates RFC 5321 and most mail servers will reject the delivery. Second, the target hostname itself must have a corresponding A or AAAA record so the sending MTA can resolve it to an IP.
How MX priority works (and why it matters)
Priority is the single most misunderstood property of MX records. The rule: lower value = higher preference. An MX with priority 10 is tried before an MX with priority 20. The numbers themselves are arbitrary (priority 5 and 50 behave identically as long as 5 is lower than 50), but the convention is to space values by 10 to leave room for future additions.
This logic enables two real-world use cases:
Failover redundancy: publish a primary MX at priority 10 and a backup MX at priority 20 (or 30, 40). If the primary is unreachable for any reason (downtime, planned maintenance, DDoS), sending servers automatically retry on the backup. Email keeps flowing without manual intervention.
Load balancing: publish multiple MX records with the same priority. Sending MTAs distribute the load across them, typically by randomizing the choice. This pattern is common in large mail infrastructures (Google Workspace publishes 5 MX records at priorities 1, 5, 5, 10, 10 for the same reason).
What priority does not do: it does not affect outbound email, it does not change spam scoring, and it does not impact deliverability beyond the routing decision.
MX records and SPF, DKIM, DMARC: the full chain
MX records handle incoming email. The triad SPF / DKIM / DMARC handles outgoing email authentication and is what determines whether your cold email lands in the inbox or the spam folder.
SPF (Sender Policy Framework): a TXT record listing the IPs and hostnames authorized to send email on behalf of your domain. Without a valid SPF, most providers (Gmail, Outlook, Yahoo) drop your messages.
DKIM (DomainKeys Identified Mail): a TXT record containing a public key. Your sending server signs each outbound message with the matching private key. Recipients verify the signature against the public key in your DNS. DKIM proves the message wasn’t altered in transit.
DMARC (Domain-based Message Authentication, Reporting and Conformance): a TXT record stating what to do with messages that fail SPF or DKIM (none, quarantine, reject). DMARC also enables reporting on who is sending email pretending to be your domain.
For cold email in 2026, the minimum baseline before sending is: valid MX records, SPF aligned with your sending platform, DKIM signing enabled on every domain, and DMARC at least in p=none mode for visibility. Skip any of these, and your campaigns underperform regardless of copy quality.
How to check your MX records in 3 ways
You can verify your MX records in under a minute. Three reliable methods:
1. MXToolbox web tool. Go to mxtoolbox.com, enter your domain, click MX Lookup. Returns the full list of MX records with priorities, plus warnings if any are misconfigured. The simplest method for non-technical users.
2. dig command (Linux, macOS, WSL). Run dig MX example.com +short to get priority + hostname per record. Add +noall +answer for a cleaner formatted output with TTL.
3. nslookup command (cross-platform, Windows-friendly). Run nslookup -type=mx example.com on Windows command prompt or terminal. Same output structure as dig, works natively without extra installation.
Run these checks on every sending domain before launching outbound. A common discovery: domains bought years ago for a now-defunct campaign still have stale MX records that need cleanup before reuse.
Common MX misconfigurations that kill deliverability
Three patterns we see repeatedly when auditing B2B cold email setups:
1. No MX record at all. The domain is registered but no MX is published. Result: you cannot receive replies. Recipients bounce, your reply rate drops to zero, and you never see negative feedback that could help iterate.
2. MX pointing to an IP address. Violates RFC. Most mail servers reject delivery, some accept it with warnings. Fix: replace the IP with a proper hostname that resolves via A or AAAA.
3. Stale or duplicate MX records. Old records from previous email providers (legacy Office 365, abandoned G Suite, removed third-party security gateways) still linger in the zone. Sending servers may attempt the wrong route. Audit and remove anything not actively in use.
A bonus issue: MX records with extremely high TTLs (86400 = 24h or more). If you need to migrate providers in a hurry, you wait a full day for the change to propagate. Set TTL to 3600 a few days before any planned migration.
How to add or modify an MX record
Modifying MX records happens at your DNS provider, which is usually your domain registrar (OVH, Gandi, Namecheap, GoDaddy) or a dedicated DNS host (Cloudflare, Route 53, Google Cloud DNS).
The general flow:
Step 1: log into your DNS provider’s control panel and find the zone editor for your domain.
Step 2: add a new record of type MX. Provide three values: hostname (usually @ or your bare domain), priority (e.g. 10), and target (the mail server hostname provided by your email service, e.g. aspmx.l.google.com for Google Workspace).
Step 3: repeat for each MX record your email provider documents. Google Workspace, Microsoft 365, and most professional services give you the exact list to copy.
Step 4: delete any old MX records that are no longer needed.
Step 5: wait for propagation. With TTL 3600, expect changes to be visible globally within 1 to 4 hours. Verify with MXToolbox or dig.
The most common mistake: forgetting to delete the previous provider’s MX records. Multiple unrelated MX records create routing ambiguity that mail servers handle poorly.
MX records and cold email: what every SDR should know
If you operate cold email at scale, MX records intersect your work in three ways.
Reply handling. Cold email replies come back to the address in your From or Reply-To header. That address’s domain must have valid MX records pointing to an inbox you actually read. Many outbound teams set up dedicated sending domains and forget to configure MX, then wonder why their reply tracking shows zero.
Domain warmup. Tools like Lemwarm, Smartlead, and Mailwarm exchange artificial emails between domains to build sender reputation. The receiving side of that exchange requires functional MX records. No MX, no warmup, no reputation built.
Deliverability audits. Before scaling a new sending domain, run a full audit: MX (incoming), SPF (sending policy), DKIM (signing), DMARC (alignment policy). MXToolbox runs all four checks in one report. Fix issues before you send the first cold email, not after the deliverability collapses.
Zeliq and multi-domain deliverability
Zeliq runs MX, SPF, DKIM, DMARC checks on every sending domain before campaigns launch, and continuously monitors infrastructure health across your sequences powered by 450 million B2B contacts. You know in real time whether a domain is healthy, in warmup, or at blacklist risk, before deliverability collapses.
Concretely: your outbound team starts a sequence on a domain and gets alerted if DKIM expires, if SPF loses an authorized IP, or if MX returns an error. No monthly manual audit to schedule.
Worked example: deliverability rebuild across 3 sending domains
Take a B2B outbound team (3 SDRs, mid-market sales) running 3 dedicated sending domains to ship 25,000 emails per month. Pre-audit, two domains had an SPF misaligned with their recent sequencer, one had lost DKIM during a DNS migration, and all three had MX TTL at 86,400 (24 hours), a leftover from an older config.
| Metric | Before audit | After rebuild | Delta |
|---|---|---|---|
| Domains with MX, SPF, DKIM, DMARC aligned | 0 / 3 | 3 / 3 | +3 |
| Average MX TTL | 86,400 s | 3,600 s | -96% |
| Inbox placement rate (Google Workspace) | 71% | 89% | +18 pts |
| Inbox placement rate (Outlook 365) | 64% | 84% | +20 pts |
| Average bounce rate | 4.8% | 1.7% | -3.1 pts |
| Cold sequence reply rate | 3.1% | 4.9% | +1.8 pt |
| Conversations generated / month | 775 | 1,225 | +450 |
The sharpest effect: 450 additional conversations per month on the same 25,000-email volume. At an average deal size of $12K ARR and a 4 percent conversation-to-deal conversion rate, that lift is worth roughly $22K of incremental signed ARR per month at the team level alone.
Rebuild cost: 1 day of senior DNS admin ($800) plus ongoing monitoring setup ($170/month, or $2,040/year). Total year 1: $2,840. Cash ROI over 12 months: ($22K x 12) / $2,840 = capped at 10-12x under strict cash-out reasoning on the marginal delta. The lesson: a single missing or misconfigured DNS record can cost more than any email copy optimization.
Send cold email on healthy domains
Zeliq monitors MX, SPF, DKIM, DMARC on every sending domain and routes campaigns only on clean infrastructure. Book a 20-minute demo.
Try for freeWhat is a DNS MX record?
A DNS MX (Mail Exchanger) record has one job: tell sending mail servers (MTAs) where to deliver emails addressed to your domain. Without a valid MX, your domain cannot receive email, which breaks your ability to capture replies on outbound campaigns. With a correct MX but a missing or broken SPF, DKIM, or DMARC, your campaigns may send but land massively in spam. MX is the first technical link in the email chain: invisible but critical.
What does mail exchanger mean?
“Mail exchanger” is the literal translation of MX. It refers to the mail server itself, the machine running the SMTP service that accepts incoming email for your domain. In practice, “MX record” and “mail exchanger” are used interchangeably to designate the DNS entry that points to that server. The mail exchanger can be self-hosted (rare in 2026) or, far more commonly, run by a managed provider (Google Workspace, Microsoft 365, Zoho, ProtonMail, Fastmail). Pointing your MX to the right managed provider takes 5 minutes; running your own takes a full-time admin.
How do I check my MX record?
Three equivalent methods depending on your technical comfort. The simplest: MXToolbox.com, which returns your full MX, SPF, DKIM, DMARC configuration in one report, with warnings if anything is broken. The fastest on the command line: dig MX yourdomain.com on Linux or macOS. The most universal on Windows: nslookup -type=mx yourdomain.com. Run these checks on every sending domain before every campaign launch, not just at initial setup.
Conclusion: 3 dated next steps
This week: audit your 3 most-used sending domains via MXToolbox. Log warnings on MX, SPF, DKIM, DMARC in a wiki shared with the outbound team.
Within 30 days: fix priority errors (missing MX, IPs instead of hostnames, duplicates inherited from old providers) and lower MX TTL to 3,600s to prepare any future migration.
Within 90 days: set up continuous monitoring on email infrastructure to avoid the “outage, fire-drill audit, late fix” cycle. If you want to integrate this monitoring into your outbound workflow, try Zeliq for free and check your stack health within two weeks.